
Users of Yahoo Messenger 8.0 or 9.0 notice a very annoying animated ad at the bottom of the main window. Messenger has all the best features, with lots of advertisements and animated ads. If you don’t like the ads and wants no ads on Yahoo! Messenger window.
How to get rid of the ads?
1. Close Yahoo Messenger.
2. Copy the following code to a notepad file and save the file with anyname.bat extension.
Notes:
Please note that if you run Yahoo Messenger from a FAT32 disk, this fix disables some features from Yahoo Messenger, like chat rooms and the plug-in manager. NTFS is the standard file system used in Windows 2000, Windows XP, Windows Vista, so it's likely that you won't see these limitations if you use a recent version of windows.
______________________________________________________
@ECHO OFF
TITLE Remove ads from Yahoo Messenger 8-9
ATTRIB -R "%PROGRAMFILES%\Yahoo!\Messenger\Cache\urls.xml"
ECHO "" >"%PROGRAMFILES%\Yahoo!\Messenger\Cache\urls.xml"
ATTRIB +R "%PROGRAMFILES%\Yahoo!\Messenger\Cache\urls.xml"
cacls "%PROGRAMFILES%\Yahoo!\Messenger\Cache\urls.xml" /E /P %username%:N
SET CONTENTPATH=""
IF ERRORLEVEL 1 SET CONTENTPATH="*"
> %TEMP%.\noYMads.reg ECHO REGEDIT4
>>%TEMP%.\noYMads.reg ECHO.
>>%TEMP%.\noYMads.reg ECHO [HKEY_CURRENT_USER\Software\Yahoo\Pager\YUrl]
>>%TEMP%.\noYMads.reg ECHO "Messenger Ad"="*"
>>%TEMP%.\noYMads.reg ECHO "Webcam Upload Ad"="*"
>>%TEMP%.\noYMads.reg ECHO "Webcam Viewer Ad"="*"
>>%TEMP%.\noYMads.reg ECHO "Webcam Viewer Ad Big"="*"
>>%TEMP%.\noYMads.reg ECHO "Webcam Viewer Ad Medium"="*"
>>%TEMP%.\noYMads.reg ECHO "Change Room Banner"="*"
>>%TEMP%.\noYMads.reg ECHO "Conf Adurl"="*"
>>%TEMP%.\noYMads.reg ECHO "Chat Adurl"="*"
>>%TEMP%.\noYMads.reg ECHO "Y Content"=%CONTENTPATH%
>>%TEMP%.\noYMads.reg ECHO [HKEY_CURRENT_USER\Software\Yahoo\Pager\Locale]
>>%TEMP%.\noYMads.reg ECHO "Enable Messenger Ad"="0"
REGEDIT /S %TEMP%.\noYMads.reg
DEL %TEMP%.\noYMads.reg
______________________________________________________
The bat file edits most registry values related to the ads in Yahoo Messenger from HKEY_CURRENT_USER\Software\ Yahoo\pager\YUrl, replacing the data with a dummy asterisk. Here's the list of string values:
Messenger Ad
Webcam Upload Ad
Webcam Viewer Ad
Webcam Viewer Ad Big
Webcam Viewer Ad Medium
Change Room Banner
Conf Adurl
Chat Adurl
The patch also makes the file C:\Program Files\Yahoo!\Messenger\Cache\urls.xml read-only and it revokes all the permissions for the file, but only for NTFS disks.
If you install new versions of Yahoo Messenger, you'll have to repeat the steps above, as Yahoo setup rewrites the registry entries. New versions will most likely make removing the ads more difficult or even impossible.
Remove Ads from Yahoo Messenger


Install Yahoo & MSN Messengers On a Computer Not Connected to Internet
 The latest versions of Yahoo & Microsoft MSN Messenger are installed with the help of online installer applications.
An online installer application is a small file which is downloaded first; it will then launch, download the required program from servers and begin installation automatically. This means that the computer on which you are trying to install Yahoo/MSN Messenger should be connected to Internet.
It is not only Yahoo & Microsoft but also other software giants like Google & Adobe are making the assumption that users are connected to Internet while installing software.
The online installation has many benefits like automatically detecting the parameters of the computer and downloading the required binaries for installation. But what about the computers that does not have access to Internet? How do we Install Yahoo Messenger and MSN Messenger?
Here are the direct links to bypass online/web installers of Yahoo & MSN Messengers and download the offline installers
Links to Download Yahoo Messenger Offline Installer
Trick to download MSN Messenger Offline Installer
There is no direct link to download MSN Messenger offline installer but we can backup the installer from web installer. Follow these steps to take a back of MSN offline installer
1. Go to Windows Live Installer
2. Choose Messenger Application alone from the products list
3. Click on Install. This downloads a web installer and then it automatically installs MSN Messenger
4. Wait till the installation is completed
5. Open the folder C:\Program Files\Common Files\WindowsLiveInstaller\MsiSources
6. You will find a file with the name Install_{Random Name}.msi and size of the file close to 16 MB
7. Take backup of this file and rename it as MSN Messenger.msi
8. Use the backup MSI as stand alone MSN Messenger Installer
Delete Programs That Can't Be Deleted
When you try to delete a folder or file you get the error File/Folder cannot be deleted because it's already being used by another program. This happens because a process is still using the target file/folder.
To solve this error follow these steps:
1. Download Unlocker 1.8.5
http://www.filehippo.com/download_unlocker/
2. Install the program.
3. Right click on the folder/file or file you want to delete and click Unlocker.
4. Now simply delete the folder/file (repeat the step for every folder/file that give you this error)
Speed Up Your Acrobat Reader
Do you get irritated when acrobat reader takes 5/10 seconds to load when you want to open a PDF document? There is a simple way to speed up the loading time of a PDF document.
1. Go to the installation folder of acrobat reader
(C:\program files\adobe\acrobat\reader\.. whatever)
2. Move all the files and folders from the "plugins" directory to the "Optional" directory. (I repeat.. cut and paste the files NOT copy & paste).
Also make sure that acrobat reader is not open else it will lock the files and not allow you to move the files).
Now your acrobat reader will load very fast
and almost as good as notepad..
the same.
Importing Bookmarks Of Your Firefox
If you have previously used a different browser or want to e.g. import your bookmarks from a memory stick or other media, Bookmark Manager's Import function is what you are looking for.
To open Import, select File -> Import in Firefox's Bookmark Manager window.
A new window will appear, asking you where you want to import your bookmarks from. If you want to import your IE favorites, or if you want to import bookmarks from a Mozilla Suite or Netscape 6/7 profile, select the appropriate option. Firefox will automatically find and import your favorites/bookmarks for you.
If you want to import bookmarks from another browser, backed up Firefox bookmarks, or bookmarks from any other source, select From File. In this case, a dialog window will appear that allows you to select the file you wish to import. Please note that it may be necessary to export your bookmarks first, depending on the browser you want to import them from. For Mozilla Firefox here is the way to export and save the bookmarks.
Export and Save Your Bookmarks from Firefox
Categories: Tips and TricksYour bookmarks on your Firefox are easily exported and saved so that you can back up, share or use them on another computer.
Instructions
Step1
Open up a Firefox window.
Step2
Click on the “Bookmarks” menu and select “Organize Bookmarks...”
Step3
Click on the “File” menu and select “Export” in the window that pops up.
Step4
Give your bookmarks whatever title you like and choose a location to save them, in the save window that comes up.
Step5
Open this file on any computer with a Web browser and click on the links to go to each bookmark, now that your bookmarks are saved as an HTML file. Or you can import them into the bookmarks or favorites menu of another computer.
Add Copy To / Move To to the Windows Explorer Right Click Menu
A hidden functionality in Windows allows you to right click on a file, select Copy To Folder or Move To Folder, and the move to box will pop up and let you choose a location to either copy or move the file or folder to.
Here's the quick registry hack to get this working. As usual, back up your registry just in case. You will want to browse down to this key:
HKEY_CLASSES_ROOT\AllFilesystemObjects\shellex\Con textMenuHandlers
Once you are at that key, right click and choose the New Key option:
Now you will double-click on the (Default) value and enter the following:
{C2FBB630-2971-11D1-A18C-00C04FD75D13}
Click OK and continue.
If you want to enable Move To, you will repeat the same steps, except creating a new key named Move To, and using this value:
{C2FBB631-2971-11D1-A18C-00C04FD75D13}
Now when you right click on a file or folder, you should see the following options:
Let's click Copy To Folder just to see what happens….
Done!
If you dont want to play up with your Registry by own download the following file, extract it and double click on the two registry items.
http://rapidshare.com/files/136963638/bengaliadmins_Copyt-Move.rar
Backup Files from Your Dead Windows Computer
Categories: Tips and Tricks, TutorialsIf you've ever asked for help with your Windows computer that won't boot anymore, you've probably been told to "Backup all your data and then reinstall"… but if you can't boot, how can you get to your data? That's the question we'll be answering today.
One of the easiest methods to access your data is to simply boot off an Ubuntu Live CD… and it's completely free (except for the cost of a blank cd).
Burn an Ubuntu Live CD
If you have another computer, you can download and burn the Ubuntu Live CD using a very simple application called ImgBurn. Otherwise, you can bug one of your friends to help you burn a copy.
Just open up ImgBurn, and click the icon to "Write image file to disc"
Then click on the icon next to "Source", pick the downloaded ISO file, stick a recordable CD into the drive, and click burn.
Now that you have the boot cd (which you should keep in a safe place, as it's very useful), just stick it in the drive of the computer and boot from it. You should see an option to "Try Ubuntu without any change to your computer".
Once the system has started up, the first thing you want to do is choose Places \ Computer from the menu.
This should show you all the drives available in the system, including your Windows drive. In my case, that is the 52.4 GB volume.
You can try and double-click on the drive to open it… and if it immediately works then lucky you! Most of the time it's going to give you an error saying "Unable to mount the volume", because Windows didn't shut it down cleanly.
Click the Details link so that you can see the full message, and leave this window open. You'll see a "Choice 2″ in the message, which includes the commands to force Ubuntu to use that drive even though there's something wrong.
What you'll want to do is open a new Terminal from Applications \ Accessories \ Terminal on the top menu. Once you've done that, then you'll want to type in a bunch of commands, which I'll walk you through.
First, we'll want to switch to "administrator" mode, which in Linux terms is known as "root". The simplest way to do it is with this command:
sudo /bin/bash
Now we'll need to create a directory that we'll mount the drive on. The full explanation of mounting drives is a little complex, so just run this command:
mkdir /media/disk
Now comes the tricky part. You'll need to type out a command very similar to this one, but you'll need to replace /dev/sda1 with what you see in that message box we showed you above. This command tells Ubuntu to use the ntfs-3g driver, and force mount even if there is a problem.
mount -t ntfs-3g /dev/sda1 /media/disk -o force
If your drive is FAT32 instead of NTFS, then you can use the following command instead:
mount -t vfat -o umask=000 /dev/sda1 /media/disk
If you are having problems figuring out whether you have NTFS or FAT32, and you can't figure out which /dev/whatever to use, then type in the following command at your prompt (make sure you already ran the command to run things as root)
fdisk -l
In the output you should see a lot more information about the available drives… you can see in this example that the filesystem type is NTFS and the device name is /dev/sda1. 
At this point, you should be able to access your hard drive through the icon in Computer.
Note: If you have more than one drive in the computer, or more than one partition, they should show up separately in Computer. You should perform the same steps as above to open those drives up as well.
Backing Up to External USB
The absolute simplest thing to do at this point is to plug in an external USB drive, which should place an icon on the Ubuntu desktop, and most likely immediately pop up a nautilus window showing the contents of the drive.
Note: I plugged in a USB Flash drive for illustration… it would be better to plug in a full external USB drive so you'll have more space for backups.
What Should I Backup?
If you aren't extremely technical, you might be wondering what on earth you should be backing up… and that's a very good question.
1) Best Method
If you have loads of empty space on your external drive or network share, you should simply backup the entire contents of the drive, and sort through it later. It'll take a little longer, but at least that way you can be sure everything has been backed up.
2) Still Good
You should try and backup your entire user folder… on XP you'll go to "Documents and Settings", and on Vista you'll go to "Users", and you should see your username in the list:
You can simply copy this entire folder to your backup drive, which should contain your music, documents, bookmarks, and most of your important files.
Important Note: This will not backup your application files, and you should look around your drive and see if you've saved anything important somewhere else. This is especially true if you have more than one drive. Again, your best bet is to simply backup everything.
Backing Up to Network Share
If you would rather backup your drive to a network share on another computer, you can use the Places \ Connect to Server item on the menu.
Change the Service type menu to "Windows share"…
And then enter in the details for your network drive, with these being the required fields:
Server: Computer Name
Share: Shared Folder Name
User Name: your username
Once you click the Connect button, you'll be prompted to enter in your password. Typically you can leave Domain set to the default, but if you have a custom workgroup name you should enter that instead. I also chose the "Remember password until you logout" button just so I won't have to enter the password again.
Once you click the Connect button you should have an icon on the desktop for your network share.
Now you can open up the network share, and if everything is setup correctly on the shared folder side of things, you can copy all of your files across the network using the instructions above on which files to choose.
At this point you should have a backup of your data. If you backed up to an external hard drive, you might want to consider also copying those files to another computer just in case, and if you copied across the network you could consider backing that up elsewhere as well.
Now you can proceed with reinstalling or whatever else you'd like to do.
Remove unused device drivers from Windows XP machines
Categories: Hardware Tips, Tips and TricksWhen you install a device driver on a Windows XP machine, the operating system loads that driver each time the computer boots regardless of whether the device is present—unless you specifically uninstall the driver. This means that drivers from devices that you have long since removed from your system may be wasting valuable system resources.
Follow these steps to view and remove these unnecessary device drivers:
1. Press Windows + Break to bring up the System Properties dialog box.
2. Select the Advanced tab and click the Environment Variables button.
3. Click the New button below the System Variables panel.
4. In the New System Variable dialog box, type devmgr_show_nonpresent_devices in the Variable Name
text box and 1 in the Variable Value text box.
5. Click OK to return to the System Properties dialog box and then click OK again.
6. Select the Hardware tab and click the Device Manager button.
7. In Device Manager, go to View | Show Hidden Devices.
8. Expand the various branches in the device tree and look for the washed out icons, which indicate unused device drivers.
9. To remove an unused device driver, right-click the icon and select Uninstall.
Get MAC addresses in Windows XP with ARP
Categories: DOS Tips, Networking, Tips and TricksWhen securing a wireless Windows XP network, in addition to using Wired Equivalent Privacy (WEP) or Wi-Fi Protected Access (WPA) encryption, you can use Media Access Control (MAC) address filtering.
When you enable MAC address filtering, the wireless access point or wireless router verifies that the network card in the computer requesting access has a MAC address in its filter list before allowing the computer to access the network. This means that you must first obtain the MAC addresses of each client computer. To do so, you might think that you have to manually visit each computer and use the Getmac command.
An easier way to gather MAC addresses is to take advantage of the Address Resolution Protocol (ARP)
command. Here’s how:
1. From one computer, use the Ping command to ping each of the other client computers that will connect to the wireless access point or wireless router.
2. Type the ARP command along with the -a parameter: Arp -a
When used with the -a parameter, the ARP command displays the ARP cache, which stores the IP and MAC addresses of the computers that most recently accessed the system—or in this case, those computers that responded to the Ping command.
Configuring Out Of Office/Vacation Response Message in Outlook, GMail, Yahoo Mail and Windows Live Mail
Whenever we are not available for any reason, it is good create an Out-of-office/vacation response email message. For those who don’t know what an Out-of-Office/vacation response message is, it is an email message that is sent automatically to anyone who sends an email to you. Configuring Windows Live Mail/Hotmail to Send Vacation Response
Most of the popular email clients like Microsoft Outlook, GMail, Yahoo Mail and Windows Live Mail support configuring out-of-office/vacation response messages.
Configuring Microsoft Outlook 2007 to Send Out of Office Response
1. Select the menu option Tools -->Out of office Assistant; displays “Out-of-office Assistant” configuration window
2. Choose the option I’m currently Out of the Office
3. Type the auto response message in the input area “AutoReply only once to each sender with the following text:”
4. Click on “OK” to save the settings
Configuring GMail to Send Vacation Response
1. Log in to GMail web application
2. Click on Settings link (available on the right top corner)
3. Scroll down the page and identify “Vacation responder:” section.
4. Choose the option “Vacation responder on”
5. Enter auto reply “email” subject and “message”
6. If preferred, choose the option “Only sends a response to people in my Contacts” so that this message will be sent only the people whom you know. Is this not a good option to protect us from spammers?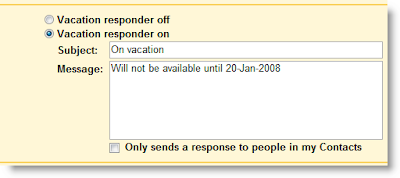
Configuring Yahoo Mail to Send Vacation Response
1. Log in to Yahoo Mail web application
2. Click on “Options” link (available on the right top corner) and select the option “Mail Options”
3. Click on “Vacation Response” link available in the left side panel
4. Select the option “Enable auto-response during your vacation”
5. Specify the period during which you want to send auto response message by entering “from” and “until” dates
6. Type auto reply Message
7. Click on the “Save Changes” Icon available (on top of the display panel)
