Whenever we are not available for any reason, it is good create an Out-of-office/vacation response email message. For those who don’t know what an Out-of-Office/vacation response message is, it is an email message that is sent automatically to anyone who sends an email to you. Configuring Windows Live Mail/Hotmail to Send Vacation Response
Most of the popular email clients like Microsoft Outlook, GMail, Yahoo Mail and Windows Live Mail support configuring out-of-office/vacation response messages.
Configuring Microsoft Outlook 2007 to Send Out of Office Response
1. Select the menu option Tools -->Out of office Assistant; displays “Out-of-office Assistant” configuration window
2. Choose the option I’m currently Out of the Office
3. Type the auto response message in the input area “AutoReply only once to each sender with the following text:”
4. Click on “OK” to save the settings
Configuring GMail to Send Vacation Response
1. Log in to GMail web application
2. Click on Settings link (available on the right top corner)
3. Scroll down the page and identify “Vacation responder:” section.
4. Choose the option “Vacation responder on”
5. Enter auto reply “email” subject and “message”
6. If preferred, choose the option “Only sends a response to people in my Contacts” so that this message will be sent only the people whom you know. Is this not a good option to protect us from spammers?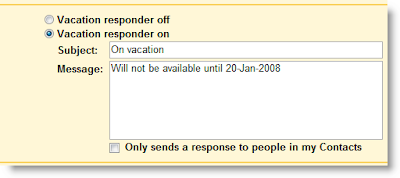
Configuring Yahoo Mail to Send Vacation Response
1. Log in to Yahoo Mail web application
2. Click on “Options” link (available on the right top corner) and select the option “Mail Options”
3. Click on “Vacation Response” link available in the left side panel
4. Select the option “Enable auto-response during your vacation”
5. Specify the period during which you want to send auto response message by entering “from” and “until” dates
6. Type auto reply Message
7. Click on the “Save Changes” Icon available (on top of the display panel)

Configuring Out Of Office/Vacation Response Message in Outlook, GMail, Yahoo Mail and Windows Live Mail
PC Slows When Accessed over the Network
Although heavy network traffic can bog down a PC, it may indeed be nothing more than a hardware problem. Specifically, your network adapter may conflict with another hardware device in your system.
If you're using a desktop PC, shut down Windows, unplug the power cable, and crack open the case. Locate your network adapter the card into which you plug your network cable remove the screw, pull out the card, and pop it into a different slot. Reassemble and turn on your PC and see if the problem goes away.
If, on the other hand, your NIC is integrated on the motherboard, it probably shares an IRQ with one of the PCI slots, and thus the PCI card in that slot may be causing the problem. Remove all nonessential PCI cards from your system, and start up Windows. If the problem persists, you may have to shuffle the remaining, essential PCI cards until you resolve the problem. If, on the other hand, the problem vanishes after you remove the PCI cards, shut down your PC and reinsert the cards one by one, reassembling and restarting your system after each insertion, until you find the culprit. If the culprit is a troublesome PCI slot, cover it with a piece of masking tape to remind yourself to keep it unoccupied.
If you're still stuck, you may need to update your network drivers or even replace your network hardware.
Find Missing Remote Printers
Categories: General Windows Tips, Hardware TipsThe traditional way to use a printer installed and shared on another PC is to open the Printers and Faxes control panel and then click Add Printer. On the "Local or Network Printer" page, choose "A network printer, or a printer attached to another computer," and on the next page, choose "Browse for a printer." Unfortunately, a variety of problems can cause the printer to be absent from this screen.
First, make sure the PC to which the printer is connected is turned on, the network is working for all PCs involved, and the printer is indeed shared. On the remote PC (the one with the printer), open the Printers and Faxes control panel. Right-click the printer you'd like to share, select
Properties, and then choose the Sharing tab. Select the "Share this printer" option, and then click OK.
If the printer is shared, and you're sure its driver supports network sharing, there's a quick workaround that usually works (although it won't solve the underlying problem, whatever that might be). Open Windows Explorer on a PC not directly connected to the printer, and click the My
Network Places folder. Open Entire Network , then Microsoft Windows Network , then your workgroup (e.g., MSHOME ), and then the PC to which the printer is attached. Inside, you'll find a Printers and Faxes folder, and inside that, you'll see all the printers shared on that PC. Right-click the printer you want to use, and select Connect.
If all goes well, the printer will show up in the Printers and Faxes dialog in 10 - 20 seconds, and you should be able to print to it immediately thereafter.
Note: Note that some printers can't be shared (this problem may come up if the manufacturer sells a more expensive "network-ready" printer that they'd rather have you buy). Review your printer's documentation and check the manufacturer's web site for driver updates if you can't get sharing to work. Typically, printers suffering from this limitation do show up in the "Browse for a printer" list but display an error when you try to install the drivers or print remotely .
Find Missing Computers in My Network Places
Categories: General Windows Tips, NetworkingThis is a really common problem, and one that is not always easily solved. First, a remote computer may not appear in My Network Places if it doesn't have any files or printers shared.
Shared folders on remote PCs can show up in two places in the My Network Places folder: shortcuts to previously accessed folders sometimes appear right in the My Network Places folder itself, but for a complete list, navigate to \ Entire Network\ Microsoft Windows Network , open your network (e.g., MSHOME ), and then open any PC to show its shared folders and printers.
Also, you may or may not see a PC that is in another workgroup in the Microsoft Windows Network folder in My Network Places . If you don't see the other workgroup, and you have control over the other PC, change its workgroup name to match the rest of the PCs on your network.
Open the System control panel (or right-click My Computer and select Properties), and then choose the Computer Name tab. The name of your PC, as well as the workgroup to which it belongs, is shown here (see Figure); click the Change button to rename the PC or join a different workgroup. All the PCs on your network should belong to the same workgroup, but no two PCs should share the same computer name.
If the workgroup matches but the PC still doesn't show up, one trick that often works is to type the name of the PC directly into Windows Explorer's address bar. (If you don't see the address bar, select View Toolbars --> Address Bar.) Erase the text in the address bar, and type two backslashes followed by the missing PC's name, like this: \\misterx
where misterx is the name of the remote PC. Press Enter, and with luck and about 510 seconds of patience Windows should list the shared folders on the remote computer.
If you still can't see the PC, make sure the network is functioning on both the remote computer and the local PC (the one you're sitting in front of). If they're both connected to a router that provides a shared Internet connection, for instance, open a web browser on each PC to test the connection. If you can load a web site, the network is working.
Often, you can force stubborn computers to show up by setting a static IP address for each PC on your network. Then use the ping command to test connectivity. Select Start --> Run, type cmd , and click OK to open a Command Prompt window, and then type:
ping 192.168.1.107
In this example, 192.168.1.107 is the IP address of the remote PC; replace this with the appropriate address. If you get a reply like the following from the remote machine, it means your computer can see and successfully communicate with that machine on your network:
Reply from 192.168.1.107: bytes=32 time=3ms TTL=64
If, on the other hand, you see a timeout message like this, the connection is broken:
Request timed out.
File sharing will not work as long as ping returns this error, so your best bet is to check your hardware and IP address settings instead of toiling with the My Network Places folder.
If the network checks out but you still can't see the remote PC, try restarting both computers and resetting your router (refer to your router's instructions for the reset procedure).
If all else fails, it's likely a problem with the hardware. Try replacing the cables if you have a wired network
Remove Old Drivers After Upgrading to New Hardware
If you are experiencing weird issues after upgrading your hardware, or you’ve just upgraded to the latest hardware device and aren’t seeing the performance you’d like, you might want to remove the old drivers which are still installed for the old hardware, even though you can’t normally see them in device manager.
What you have to do is set a less-known flag to allow you to see non-present devices, and then launch device manager. You’ll then see the old devices in the list, and can uninstall the drivers for them.
In Windows Vista, the first thing you’ll need to do is open a command prompt in administrator mode. Type cmd into the start menu search box, and then use Ctrl+Shift+Enter to open in administrator mode. (You can also right-click on the command prompt and choose Run as Administrator)
Now paste in the following line:
SET DEVMGR_SHOW_NONPRESENT_DEVICES=1
Then type in devmgmt.msc to start up Device Manager from the administrator command prompt:

Once you are in Device Manager, go to the View menu and choose Show Hidden Devices, which will show all the device drivers including things that aren’t currently installed in your computer.

Notice how I have 6 mice in the list, even though I only have two installed (and my drawing tablet). The other 3 mice are old mice that I’ve used until they died…. the Geek tends to wear through input devices very quickly since he never leaves the computer…

You can right-click on the driver and then choose Uninstall from the menu to remove the drivers for that old hardware.
I’ve found that this can resolve a lot of weird issues, and even increase performance on some machines where you’ve upgraded a ton of times. This isn’t necessarily going to increase performance, but it’s nice to have a tidy computer nonetheless.
Lock folders without any software
Categories: DOS Tips, General Windows Tips, Tweak1. Open Notepad and copy the below code
2. Change your password in the code it’s shown the place where to type your password.
3. Save file as locker.bat .
4. Now double click on locker .bat
5. I t will create folder with Locker automatically for u. After creation of the Locker folder, place the contents u want to lock inside the Locker Folder and run locker.bat again .
************************************************
cls
@ECHO OFF
title Folder Locker
if EXIST “Control Panel.{21EC2020-3AEA-1069-A2DD-08002B30309D}” goto UNLOCK
if NOT EXIST Locker goto MDLOCKER
:CONFIRM
echo Are you sure u want to Lock the folder(Y/N)
set/p “cho=>”
if %cho%==Y goto LOCK
if %cho%==y goto LOCK
if %cho%==n goto END
if %cho%==N goto END
echo Invalid choice.
goto CONFIRM
:LOCK
ren Locker “Control Panel.{21EC2020-3AEA-1069-A2DD-08002B30309D}”
attrib +h +s “Control Panel.{21EC2020-3AEA-1069-A2DD-08002B30309D}”
echo Folder locked
goto End
:UNLOCK
echo Enter password to Unlock folder
set/p “pass=>”
if NOT %pass%== type your password here goto FAIL
attrib -h -s “Control Panel.{21EC2020-3AEA-1069-A2DD-08002B30309D}”
ren “Control Panel.{21EC2020-3AEA-1069-A2DD-08002B30309D}” Locker
echo Folder Unlocked successfully
goto End
:FAIL
echo Invalid password
goto end
:MDLOCKER
md Locker
echo Locker created successfully
goto End
:End
Change The Default Location For Installing Apps
Categories: General Windows Tips, TweakAs the size of hardrives increase, more people are using partitions to seperate and store groups of files.
XP uses the C:\Program Files directory as the default base directory into which new programs are installed. However, you can change the default installation drive and/ or directory by using a Registry hack.
Run the Registry Editor (regedit)and go to
HKEY_LOCAL_MACHINE\SOFTWARE\Microsoft\Windows\Curr entVersion
Look for the value named ProgramFilesDir. by default,this value will be C:\Program Files. Edit the value to any valid drive or folder and XP will use that new location as the default installation directory for new programs.
Disable the Welcome Screen in Windows XP PRO
Categories: General Windows Tips, Tweak
You must have a computer administrator account on a computer that is a member of a workgroup or is a stand-alone computer to turn on or turn off the Use the Welcome screen feature. Logging on at the Welcome screen is not available on computers that are members of a network domain.
1.Open User Accounts in Control Panel.
2.Click Change the way users log on or off.

Do one of the following:
1.To specify that users log on to the computer using the Welcome screen, select the Use the Welcome screen check box. A user logs on to the computer by clicking his or her user account name on the Welcome screen. If a password is assigned to the account, the user is prompted to type it.
2.To specify that users log on to the computer without using the Welcome screen, clear the Use the Welcome screen check box. The Welcome screen will no longer appear when you start the computer. To log on to the computer, type your user name (and password, if you have one) in the standard Log On to Windows dialog box.

Note: To open User Accounts, click Start, click Control Panel, and then double-click User Accounts. Fast User Switching is available only when the Welcome screen is turned on.
Note: To disable the Welcome screen you can also open the Registry editor and go to
HKEY_LOCAL_MACHINE\Software\Microsoft\
Windows NT\Current Version\WinLogon
Change the value for LogonType, from a “1” to a “0″. This is because a 0 specifies Classic Mode and a 1 specifies Welcome Screen.
Now, exit the Registry and Reboot your computerBurn .bin file Without A .cue file
Categories: Misc TutorialsTo burn a bin file, you will need an appropriate cue file.
You do exactly the same as for iso files, but when you click on “burn image,” you don’t browse to the bin itself, but instead to the cue file, and you open that one.
When the writer starts to burn, it will automatically search for the bin file and start burning it. In fact, the cue file tells the burning program where it can find the bin file that is attached to it. It is VERY IMPORTANT that you use the right cue file when you burn a bin. i.e both cue and bin files that are attached to each other must be located in the same folder, and every bin file has it’s own cue file.
Normally, when you download a bin file, you can download the appropriate cue file as well. If you do not have the cue file (or feel bold) you can make the cue file yourself, which is really easy to do:
a. Open notepad
b. Copy the folowing text into notepad:
FILE“nameofimage“BINARY
TRACK 01 MODE1/2352
INDEX 01 00:00:00
Where nameofimage.bin is the name of the bin file you want ot burn.
c. The rest is easy: just save the notepad text with the name of the bin, but with the cue extension.
d. The file should be saved in the same folder as its appropriate bin file and should be something like myfile.cue
Or you can use Alcohol 120% to burn directly from the bin file.
Revo Uninstaller
Categories: Downloads
Revo Uninstaller helps you to uninstall and remove unwanted programs installed on your computer even if you have problems uninstalling and cannot uninstall them from "Windows Add or Remove Programs" control panel applet.
Revo Uninstaller is a much faster and more powerful alternative to "Windows Add or Remove Programs" applet!
With its advanced and fast algorithm, Revo Uninstaller analyzes an application's data before uninstall and scans after you uninstall an application. After the program's regular uninstaller runs, you can remove additional unnecessary files, folders and registry keys that are usually left over on your computer. Even if you have a broken installation, Revo Uninstaller scans for an application's data on your hard disk drives and in the Windows registry and shows all found files, folders and registry keys so you can delete them.
With its unique "Hunter mode", Revo Uninstaller offers you some simple, easy to use, but effective and powerful approaches to manage (uninstall, stop, delete, disable from auto starting) and to get information about your installed and/or running programs.
Revo Uninstaller gives you another 8 handy and powerful tools to clean up your system.
Here is the list of the tools and utilities included in Revo Uninstaller:
Auto Start Manager - Stop programs that start automatically on Windows startup; speed up loading of Windows!
Windows Tools Manager - Handy and useful tools bundled with every version of Windows; easily find useful system tools and options!
Junk Files Cleaner - Find and remove unnecessary files from your computer; free up disk space and delete files you do not need!
Browsers History Cleaner - Erase web browser history, visited pages history and temporary internet files of Internet Explorer, Firefox, Netscape and Opera web browsers; free up a lot of disk space by deleting temporary internet files like temporary saved videos, temporary flash files, temporary pictures etc!
Office History Cleaner - Remove the history of most recently used files in MS Office; remove your tracks by deleting the list of last opened MS Office documents!
Windows History Cleaner - Remove the history of recently opened files, delete temporary files, remove usage tracks and other history items that are saved by Windows; remove your tracks saved by Windows for a lot of operations!
Unrecoverable Delete Tool - Erase files and folders forever; be sure that nobody could recover your files and folders after deleting!
Evidence Remover - Make sure already deleted files, folders and other data are unrecoverable; securely erase your data!
Revo Uninstaller is compatible with the following operating systems:
Windows 2000, Windows XP, Windows 2003, Windows Vista 64 bit operating systems are NOT supported!
Benefits of Revo Uninstaller :
- Revo Uninstaller is completely free - no cost, no adware, no spyware;
- You can uninstall programs easily and correctly;
- You can uninstall a program and scan after its built-in uninstaller for leftover registry keys, files and folders;
- You can uninstall programs even when their built-in uninstaller is corrupted and cannot be uninstalled;
- You can search as you type for installed programs; The search is much faster than "Windows Add or Remove Programs" control panel applet!
- You can see the list of installed programs much faster than with "Windows Add or Remove Programs" control panel applet!
- You can view a lot of details of the programs installed on your computer and uninstall programs you don't need (for example uninstall programs depending on their size to free disk space);
- You can use an innovative "Hunter mode" to uninstall, kill and delete programs. Uninstall unwanted programs just by aiming on their window or icon;
- You can use a "Drag and Drop" mode to uninstall, kill and delete programs;
- You can view and manage programs loaded on Windows startup;
- You can clean any junk, temporary and unnecessary files from your drives;
- You can have fast access to the most useful built-in Windows tools;
- You can erase all your browser history in Internet Explorer, Firefox, Opera and Netscape browsers;
- You can erase the recent document history of Microsoft Office products from version Microsoft Office 2000 till Microsoft Office 2007;
- You can erase most of the important traces you have left behind after working with Windows;
- You can permanently delete all of your already deleted files so they become completely unrecoverable by any software;
- You can securely delete any existing file or folder so it becomes unrecoverable by any software;
- You can use Revo Uninstaller and never have to solve uninstall problems;
Protect Shared Files
Categories: General Windows Tips, Security and PrivacyAny computer connected to your PC over a network including the several billion machines on the Internet may be able to access the files in your shared folders. Thus, the best way to protect your data is to not share it in the first place. If you need to share files, exclude folders that contain particularly sensitive data.
The first thing you need to do is set a password for your user account. Open the User Accounts control panel, select your account from the list, and then click "Create a password." Type your password twice, followed by a clue to act as a reminder down the road (you may well need it),
and then click the Create Password button when you're done. Thereafter, anyone wanting to access your files from another computer on your network will have to supply the password (with some exceptions for Windows XP Professional).
Now, unless you employ some sort of firewall anyone outside your local network namely, everyone on the Internet can access your data (and yes, no matter how uninteresting you may think the contents of your PC are, this can happen to you). Windows XP comes with the "Windows Firewall," a feeble software-based solution, but nothing beats a hardware firewall placed between you and the rest of the world. If you don't have one already, get yourself a router for this purpose.
What About Encryption?
Windows XP Professional also has some built-in data encryption features, but encryption offers no more protection than restrictive permissions when using shared folders. Rather, encryption is designed to protect your data from those who use your PC directly, either by sitting in front of it
or by remote control using Terminal Services (a.k.a. Remote Desktop).
Warning: If you're using a wireless network, anyone within range may be able to join your network and access your files.
For any more protection, you'll need to use permissions , which are special settings that control precisely who can do what to your files. Permissions are available only in Windows XP Professional (and Media Center Edition); if you're using Windows XP Home, your ability to protect your data effectively stops here.
On an XP Pro system, every file, folder, and drive has two sets of permissions you can set: permissions for local users (other people sitting at your PC), and permissions for anyone accessing your files through a shared folder. To set the permissions for a shared folder, right-click the folder, select Properties, choose the Sharing tab, and then click the Permissions button. The Share Permissions window, shown in Figure, shows a list of configured users in the top list, and the specific things the selected user is allowed to do down below.

First, make sure your own username appears in the upper list; if it doesn't, or if it merely shows "Everyone" (like the one in Figure), click the Add button. Type your usernameor the username of the person you want to be able to access your stuff in the "Enter the object names to select" field, and then click the Check Names button. If Windows underlines what you've typed, the username is okay; otherwise, you'll get a "Name not Found" message. Click OK when you're done adding names.
Next, highlight your username in the "Group or user names" list, and place checkmarks in the boxes in the Allow column below as you see fit. Want others to be able to read the files in this folder but not change any of them? Put a checkmark in the Read box, but not in the Full Control
or Change boxes.
Note: In most cases, you won't have to bother with the checkboxes in the Deny column unless you start messing with "groups" of users. Permission to carry out a given action is implicitly denied as long as there's no checkmark in the corresponding Allow box .
If you want to deny any user access to your files particularly the self-explanatory "Everyone"highlight the username, and click the Remove button. Now, any user who is not expressly listed here (or included in any groups listed here) will not have access to your shared files.
When you're done, click OK. The changes take effect immediately and apply to the selected folder share, as well as to all subfolders and files contained therein.
Note: By adding someone else's username to the Permissions window, you can protect your data without handing over your username and password. If your PC is part of an NT domain (typical in a corporate environment), you can add users from your domain or even another domain by clicking the Locations button to change the scope of the user validation. But on a home network, you'll need to create a new user account on your PC (using the User Accounts control panel) before you can type it into the Permissions window .
BandWidth Explained
Categories: Misc TutorialsThis is well written explanation about bandwidth, very useful info.
BandWidth Explained
Most hosting companies offer a variety of bandwidth options in their plans. So exactly what is bandwidth as it relates to web hosting? Put simply, bandwidth is the amount of traffic that is allowed to occur between your web site and the rest of the internet. The amount of bandwidth a hosting company can provide is determined by their network connections, both internal to their data center and external to the public internet.
Network Connectivity
The internet, in the most simplest of terms, is a group of millions of computers connected by networks. These connections within the internet can be large or small depending upon the cabling and equipment that is used at a particular internet location. It is the size of each network connection that determines how much bandwidth is available. For example, if you use a DSL connection to connect to the internet, you have 1.54 Mega bits (Mb) of bandwidth. Bandwidth therefore is measured in bits (a single 0 or 1). Bits are grouped in bytes which form words, text, and other information that is transferred between your computer and the internet.
If you have a DSL connection to the internet, you have dedicated bandwidth between your computer and your internet provider. But your internet provider may have thousands of DSL connections to their location. All of these connection aggregate at your internet provider who then has their own dedicated connection to the internet (or multiple connections) which is much larger than your single connection. They must have enough bandwidth to serve your computing needs as well as all of their other customers. So while you have a 1.54Mb connection to your internet provider, your internet provider may have a 255Mb connection to the internet so it can accommodate your needs and up to 166 other users (255/1.54).
Traffic
A very simple analogy to use to understand bandwidth and traffic is to think of highways and cars. Bandwidth is the number of lanes on the highway and traffic is the number of cars on the highway. If you are the only car on a highway, you can travel very quickly. If you are stuck in the middle of rush hour, you may travel very slowly since all of the lanes are being used up.
Traffic is simply the number of bits that are transferred on network connections. It is easiest to understand traffic using examples. One Gigabyte is 2 to the 30th power (1,073,741,824) bytes. One gigabyte is equal to 1,024 megabytes. To put this in perspective, it takes one byte to store one character. Imagine 100 file cabinets in a building, each of these cabinets holds 1000 folders. Each folder has 100 papers. Each paper contains 100 characters - A GB is all the characters in the building. An MP3 song is about 4MB, the same song in wav format is about 40MB, a full length movie can be 800MB to 1000MB (1000MB = 1GB).
If you were to transfer this MP3 song from a web site to your computer, you would create 4MB of traffic between the web site you are downloading from and your computer. Depending upon the network connection between the web site and the internet, the transfer may occur very quickly, or it could take time if other people are also downloading files at the same time. If, for example, the web site you download from has a 10MB connection to the internet, and you are the only person accessing that web site to download your MP3, your 4MB file will be the only traffic on that web site. However, if three people are all downloading that same MP at the same time, 12MB (3 x 4MB) of traffic has been created. Because in this example, the host only has 10MB of bandwidth, someone will have to wait. The network equipment at the hosting company will cycle through each person downloading the file and transfer a small portion at a time so each person’s file transfer can take place, but the transfer for everyone downloading the file will be slower. If 100 people all came to the site and downloaded the MP3 at the same time, the transfers would be extremely slow. If the host wanted to decrease the time it took to download files simultaneously, it could increase the bandwidth of their internet connection (at a cost due to upgrading equipment).
Hosting Bandwidth
In the example above, we discussed traffic in terms of downloading an MP3 file. However, each time you visit a web site, you are creating traffic, because in order to view that web page on your computer, the web page is first downloaded to your computer (between the web site and you) which is then displayed using your browser software (Internet Explorer, Netscape, etc.) . The page itself is simply a file that creates traffic just like the MP3 file in the example above (however, a web page is usually much smaller than a music file).
A web page may be very small or large depending upon the amount of text and the number and quality of images integrated within the web page. For example, the home page for CNN.com is about 200KB (200 Kilobytes = 200,000 bytes = 1,600,000 bits). This is typically large for a web page. In comparison, Yahoo’s home page is about 70KB.
How Much Bandwidth Is Enough?
It depends (don’t you hate that answer). But in truth, it does. Since bandwidth is a significant determinant of hosting plan prices, you should take time to determine just how much is right for you. Almost all hosting plans have bandwidth requirements measured in months, so you need to estimate the amount of bandwidth that will be required by your site on a monthly basis
If you do not intend to provide file download capability from your site, the formula for calculating bandwidth is fairly straightforward:
Average Daily Visitors x Average Page Views x Average Page Size x 31 x Fudge Factor
If you intend to allow people to download files from your site, your bandwidth calculation should be:
[(Average Daily Visitors x Average Page Views x Average Page Size) +
(Average Daily File Downloads x Average File Size)] x 31 x Fudge Factor
Let us examine each item in the formula:
Average Daily Visitors - The number of people you expect to visit your site, on average, each day. Depending upon how you market your site, this number could be from 1 to 1,000,000.
Average Page Views - On average, the number of web pages you expect a person to view. If you have 50 web pages in your web site, an average person may only view 5 of those pages each time they visit.
Average Page Size - The average size of your web pages, in Kilobytes (KB). If you have already designed your site, you can calculate this directly.
Average Daily File Downloads - The number of downloads you expect to occur on your site. This is a function of the numbers of visitors and how many times a visitor downloads a file, on average, each day.
Average File Size - Average file size of files that are downloadable from your site. Similar to your web pages, if you already know which files can be downloaded, you can calculate this directly.
Fudge Factor - A number greater than 1. Using 1.5 would be safe, which assumes that your estimate is off by 50%. However, if you were very unsure, you could use 2 or 3 to ensure that your bandwidth requirements are more than met.
Usually, hosting plans offer bandwidth in terms of Gigabytes (GB) per month. This is why our formula takes daily averages and multiplies them by 31.
Summary
Most personal or small business sites will not need more than 1GB of bandwidth per month. If you have a web site that is composed of static web pages and you expect little traffic to your site on a daily basis, go with a low bandwidth plan. If you go over the amount of bandwidth allocated in your plan, your hosting company could charge you over usage fees, so if you think the traffic to your site will be significant, you may want to go through the calculations above to estimate the amount of bandwidth required in a hosting plan.
Keyboard Shortcuts
Categories: DOS Tips, General Windows TipsCTRL+C (Copy)
CTRL+X (Cut)
CTRL+V (Paste)
CTRL+Z (Undo)
DELETE (Delete)
SHIFT+DELETE (Delete the selected item permanently without placing the item in the Recycle Bin)
CTRL while dragging an item (Copy the selected item)
CTRL+SHIFT while dragging an item (Create a shortcut to the selected item)
F2 key (Rename the selected item)
CTRL+RIGHT ARROW (Move the insertion point to the beginning of the next word)
CTRL+LEFT ARROW (Move the insertion point to the beginning of the previous word)
CTRL+DOWN ARROW (Move the insertion point to the beginning of the next paragraph)
CTRL+UP ARROW (Move the insertion point to the beginning of the previous paragraph)
CTRL+SHIFT with any of the arrow keys (Highlight a block of text)
SHIFT with any of the arrow keys (Select more than one item in a window or on the desktop, or select text in a document)
CTRL+A (Select all)
F3 key (Search for a file or a folder)
ALT+ENTER (View the properties for the selected item)
ALT+F4 (Close the active item, or quit the active program)
ALT+ENTER (Display the properties of the selected object)
ALT+SPACEBAR (Open the shortcut menu for the active window)
CTRL+F4 (Close the active document in programs that enable you to have multiple documents open simultaneously)
ALT+TAB (Switch between the open items)
ALT+ESC (Cycle through items in the order that they had been opened)
F6 key (Cycle through the screen elements in a window or on the desktop)
F4 key (Display the Address bar list in My Computer or Windows Explorer)
SHIFT+F10 (Display the shortcut menu for the selected item)
ALT+SPACEBAR (Display the System menu for the active window)
CTRL+ESC (Display the Start menu)
ALT+Underlined letter in a menu name (Display the corresponding menu)
Underlined letter in a command name on an open menu (Perform the corresponding command)
F10 key (Activate the menu bar in the active program)
RIGHT ARROW (Open the next menu to the right, or open a submenu)
LEFT ARROW (Open the next menu to the left, or close a submenu)
F5 key (Update the active window)
BACKSPACE (View the folder one level up in My Computer or Windows Explorer)
ESC (Cancel the current task)
SHIFT when you insert a CD-ROM into the CD-ROM drive (Prevent the CD-ROM from automatically playing)
Dialog Box Keyboard Shortcuts
CTRL+TAB (Move forward through the tabs)
CTRL+SHIFT+TAB (Move backward through the tabs)
TAB (Move forward through the options)
SHIFT+TAB (Move backward through the options)
ALT+Underlined letter (Perform the corresponding command or select the corresponding option)
ENTER (Perform the command for the active option or button)
SPACEBAR (Select or clear the check box if the active option is a check box)
Arrow keys (Select a button if the active option is a group of option buttons)
F1 key (Display Help)
F4 key (Display the items in the active list)
BACKSPACE (Open a folder one level up if a folder is selected in the Save As or Open dialog box)
microsoft Natural Keyboard Shortcuts
Windows Logo (Display or hide the Start menu)
Windows Logo+BREAK (Display the System Properties dialog box)
Windows Logo+D (Display the desktop)
Windows Logo+M (Minimize all of the windows)
Windows Logo+SHIFT+M (Restore the minimized windows)
Windows Logo+E (Open My Computer)
Windows Logo+F (Search for a file or a folder)
CTRL+Windows Logo+F (Search for computers)
Windows Logo+F1 (Display Windows Help)
Windows Logo+ L (Lock the keyboard)
Windows Logo+R (Open the Run dialog box)
Windows Logo+U (Open Utility Manager)
Accessibility Keyboard Shortcuts
Right SHIFT for eight seconds (Switch FilterKeys either on or off)
Left ALT+left SHIFT+PRINT SCREEN (Switch High Contrast either on or off)
Left ALT+left SHIFT+NUM LOCK (Switch the MouseKeys either on or off)
SHIFT five times (Switch the StickyKeys either on or off)
NUM LOCK for five seconds (Switch the ToggleKeys either on or off)
Windows Logo +U (Open Utility Manager)
Windows Explorer Keyboard Shortcuts
END (Display the bottom of the active window)
HOME (Display the top of the active window)
NUM LOCK+Asterisk sign (*) (Display all of the subfolders that are under the selected folder)
NUM LOCK+Plus sign (+) (Display the contents of the selected folder)
NUM LOCK+Minus sign (-) (Collapse the selected folder)
LEFT ARROW (Collapse the current selection if it is expanded, or select the parent folder)
RIGHT ARROW (Display the current selection if it is collapsed, or select the first subfolder)
Shortcut Keys for Character Map
After you double-click a character on the grid of characters, you can move through the grid by using the keyboard shortcuts:
RIGHT ARROW (Move to the right or to the beginning of the next line)
LEFT ARROW (Move to the left or to the end of the previous line)
UP ARROW (Move up one row)
DOWN ARROW (Move down one row)
PAGE UP (Move up one screen at a time)
PAGE DOWN (Move down one screen at a time)
HOME (Move to the beginning of the line)
END (Move to the end of the line)
CTRL+HOME (Move to the first character)
CTRL+END (Move to the last character)
SPACEBAR (Switch between Enlarged and Normal mode when a character is selected)
Microsoft Management Console (MMC) Main Window Keyboard Shortcuts
CTRL+O (Open a saved console)
CTRL+N (Open a new console)
CTRL+S (Save the open console)
CTRL+M (Add or remove a console item)
CTRL+W (Open a new window)
F5 key (Update the content of all console windows)
ALT+SPACEBAR (Display the MMC window menu)
ALT+F4 (Close the console)
ALT+A (Display the Action menu)
ALT+V (Display the View menu)
ALT+F (Display the File menu)
ALT+O (Display the Favorites menu)
MMC Console Window Keyboard Shortcuts
CTRL+P (Print the current page or active pane)
ALT+Minus sign (-) (Display the window menu for the active console window)
SHIFT+F10 (Display the Action shortcut menu for the selected item)
F1 key (Open the Help topic, if any, for the selected item)
F5 key (Update the content of all console windows)
CTRL+F10 (Maximize the active console window)
CTRL+F5 (Restore the active console window)
ALT+ENTER (Display the Properties dialog box, if any, for the selected item)
F2 key (Rename the selected item)
CTRL+F4 (Close the active console window. When a console has only one console window, this shortcut closes the console)
Remote Desktop Connection Navigation
CTRL+ALT+END (Open the m*cro$oft Windows NT Security dialog box)
ALT+PAGE UP (Switch between programs from left to right)
ALT+PAGE DOWN (Switch between programs from right to left)
ALT+INSERT (Cycle through the programs in most recently used order)
ALT+HOME (Display the Start menu)
CTRL+ALT+BREAK (Switch the client computer between a window and a full screen)
ALT+DELETE (Display the Windows menu)
CTRL+ALT+Minus sign (-) (Place a snapshot of the active window in the client on the Terminal server clipboard and provide the same functionality as pressing PRINT SCREEN on a local computer.)
CTRL+ALT+Plus sign (+) (Place a snapshot of the entire client window area on the Terminal server clipboard and provide the same functionality as pressing ALT+PRINT SCREEN on a local computer.)
Microsoft Internet Explorer Navigation
CTRL+B (Open the Organize Favorites dialog box)
CTRL+E (Open the Search bar)
CTRL+F (Start the Find utility)
CTRL+H (Open the History bar)
CTRL+I (Open the Favorites bar)
CTRL+L (Open the Open dialog box)
CTRL+N (Start another instance of the browser with the same Web address)
CTRL+O (Open the Open dialog box, the same as CTRL+L)
CTRL+P (Open the Print dialog box)
CTRL+R (Update the current Web page)
CTRL+W (Close the current window)
Make Your PC Experience Easy With Shortcuts
Categories: DOS Tips, General Windows TipsRun Commands:
compmgmt.msc - Computer management
devmgmt.msc - Device manager
diskmgmt.msc - Disk management
dfrg.msc - Disk defrag
eventvwr.msc - Event viewer
fsmgmt.msc - Shared folders
gpedit.msc - Group policies
lusrmgr.msc - Local users and groups
perfmon.msc - Performance monitor
rsop.msc - Resultant set of policies
secpol.msc - Local security settings
services.msc - Various Services
msconfig - System Configuration Utility
regedit - Registry Editor
msinfo32 - System Information
sysedit - System Edit
win.ini - windows loading information (also system.ini)
winver - Shows current version of windows
mailto: - Opens default email client
command - Opens command prompt (also cmd)
Run Commands to access the control panel:
Add/Remove Programs control - appwiz.cpl
Date/Time Properties control - timedate.cpl
Display Properties control - desk.cpl
FindFast control - findfast.cpl
Fonts Folder control - fonts
Internet Properties control - inetcpl.cpl
Keyboard Properties control - main.cpl keyboard
Mouse Properties control - main.cpl
Multimedia Properties control - mmsys.cpl
Network Properties control - netcpl.cpl
Password Properties control - password.cpl
Printers Folder control - printers
Sound Properties control - mmsys.cpl sounds
System Properties control - sysdm.cpl
Command Prompt:
ANSI.SYS Defines functions that change display graphics, control cursor movement, and reassign keys.
APPEND Causes MS-DOS to look in other directories when editing a file or running a command.
ARP Displays, adds, and removes arp information from network devices.
ASSIGN Assign a drive letter to an alternate letter.
ASSOC View the file associations.
AT Schedule a time to execute commands or programs.
ATMADM Lists connections and addresses seen by Windows ATM call manager.
ATTRIB Display and change file attributes.
BATCH Recovery console command that executes a series of commands in a file.
BOOTCFG Recovery console command that allows a user to view, modify, and rebuild the boot.ini
BREAK Enable / disable CTRL + C feature.
CACLS View and modify file ACL’s.
CALL Calls a batch file from another batch file.
CD Changes directories.
CHCP Supplement the International keyboard and character set information.
CHDIR Changes directories.
CHKDSK Check the hard disk drive running FAT for errors.
CHKNTFS Check the hard disk drive running NTFS for errors.
CHOICE Specify a listing of multiple options within a batch file.
CLS Clears the screen.
CMD Opens the command interpreter.
COLOR Easily change the foreground and background color of the MS-DOS window.
COMP Compares files.
COMPACT Compresses and uncompress files.
CONTROL Open control panel icons from the MS-DOS prompt.
CONVERT Convert FAT to NTFS.
COPY Copy one or more files to an alternate location.
CTTY Change the computers input/output devices.
DATE View or change the systems date.
DEBUG Debug utility to create assembly programs to modify hardware settings.
DEFRAG Re-arrange the hard disk drive to help with loading programs.
DEL Deletes one or more files.
DELETE Recovery console command that deletes a file.
DELTREE Deletes one or more files and/or directories.
DIR List the contents of one or more directory.
DISABLE Recovery console command that disables Windows system services or drivers.
DISKCOMP Compare a disk with another disk.
DISKCOPY Copy the contents of one disk and place them on another disk.
DOSKEY Command to view and execute commands that have been run in the past.
DOSSHELL A GUI to help with early MS-DOS users.
DRIVPARM Enables overwrite of original device drivers.
ECHO Displays messages and enables and disables echo.
EDIT View and edit files.
EDLIN View and edit files.
EMM386 Load extended Memory Manager.
ENABLE Recovery console command to enable a disable service or driver.
ENDLOCAL Stops the localization of the environment changes enabled by the setlocal command.
ERASE Erase files from computer.
EXIT Exit from the command interpreter.
EXPAND Expand a M*cros*ft Windows file back to it’s original format.
EXTRACT Extract files from the M*cros*ft Windows cabinets.
FASTHELP Displays a listing of MS-DOS commands and information about them.
FC Compare files.
FDISK Utility used to create partitions on the hard disk drive.
FIND Search for text within a file.
FINDSTR Searches for a string of text within a file.
FIXBOOT Writes a new boot sector.
FIXMBR Writes a new boot record to a disk drive.
FOR Boolean used in batch files.
FORMAT Command to erase and prepare a disk drive.
FTP Command to connect and operate on a FTP server.
FTYPE Displays or modifies file types used in file extension associations.
GOTO Moves a batch file to a specific label or location.
GRAFTABL Show extended characters in graphics mode.
HELP Display a listing of commands and brief explanation.
IF Allows for batch files to perform conditional processing.
IFSHLP.SYS 32-bit file manager.
IPCONFIG Network command to view network adapter settings and assigned values.
KEYB Change layout of keyboard.
LABEL Change the label of a disk drive.
LH Load a device driver in to high memory.
LISTSVC Recovery console command that displays the services and drivers.
LOADFIX Load a program above the first 64k.
LOADHIGH Load a device driver in to high memory.
LOCK Lock the hard disk drive.
LOGON Recovery console command to list installations and enable administrator login.
MAP Displays the device name of a drive.
MD Command to create a new directory.
MEM Display memory on system.
MKDIR Command to create a new directory.
MODE Modify the port or display settings.
MORE Display one page at a time.
MOVE Move one or more files from one directory to another directory.
MSAV Early M*cros*ft Virus scanner.
MSD Diagnostics utility.
MSCDEX Utility used to load and provide access to the CD-ROM.
NBTSTAT Displays protocol statistics and current TCP/IP connections using NBT
NET Update, fix, or view the network or network settings
NETSH Configure dynamic and static network information from MS-DOS.
NETSTAT Display the TCP/IP network protocol statistics and information.
NLSFUNC Load country specific information.
NSLOOKUP Look up an IP address of a domain or host on a network.
PATH View and modify the computers path location.
PATHPING View and locate locations of network latency.
PAUSE Command used in batch files to stop the processing of a command.
PING Test / send information to another network computer or network device.
POPD Changes to the directory or network path stored by the pushd command.
POWER Conserve power with computer portables.
PRINT Prints data to a printer port.
PROMPT View and change the MS-DOS prompt.
PUSHD Stores a directory or network path in memory so it can be returned to at any time.
QBASIC Open the QBasic.
RD Removes an empty directory.
REN Renames a file or directory.
RENAME Renames a file or directory.
RMDIR Removes an empty directory.
ROUTE View and configure windows network route tables.
RUNAS Enables a user to execute a program on another computer.
SCANDISK Run the scandisk utility.
SCANREG Scan registry and recover registry from errors.
SET Change one variable or string to another.
SETLOCAL Enables local environments to be changed without affecting anything else.
SETVER Change MS-DOS version to trick older MS-DOS programs.
SHARE Installs support for file sharing and locking capabilities.
SHIFT Changes the position of replaceable parameters in a batch program.
SHUTDOWN Shutdown the computer from the MS-DOS prompt.
SMARTDRV Create a disk cache in conventional memory or extended memory.
SORT Sorts the input and displays the output to the screen.
START Start a separate window in Windows from the MS-DOS prompt.
SUBST Substitute a folder on your computer for another drive letter.
SWITCHES Remove add functions from MS-DOS.
SYS Transfer system files to disk drive.
TELNET Telnet to another computer / device from the prompt.
TIME View or modify the system time.
TITLE Change the title of their MS-DOS window.
TRACERT Visually view a network packets route across a network.
TREE View a visual tree of the hard disk drive.
TYPE Display the contents of a file.
UNDELETE Undelete a file that has been deleted.
UNFORMAT Unformat a hard disk drive.
UNLOCK Unlock a disk drive.
VER Display the version information.
VERIFY Enables or disables the feature to determine if files have been written properly.
VOL Displays the volume information about the designated drive.
XCOPY Copy multiple files, directories, and/or drives from one location to another.
TRUENAME When placed before a file, will display the whole directory in which it exists
TASKKILL It allows you to kill those unneeded or locked up applications
Windows XP Shortcuts:
ALT+- (ALT+hyphen) Displays the Multiple Document Interface (MDI) child window’s System menu
ALT+ENTER View properties for the selected item
ALT+ESC Cycle through items in the order they were opened
ALT+F4 Close the active item, or quit the active program
ALT+SPACEBAR Display the System menu for the active window
ALT+TAB Switch between open items
ALT+Underlined Letter Display the corresponding menu
BACKSPACE View the folder one level up in My Computer or Windows Explorer
CTRL+A Select all
CTRL+B Bold
CTRL+C Copy
CTRL+I Italics
CTRL+O Open an item
CTRL+U Underline
CTRL+V Paste
CTRL+X Cut
CTRL+Z Undo
CTRL+F4 Close the active document
CTRL while dragging Copy selected item
CTRL+SHIFT while dragging Create shortcut to selected item
CTRL+RIGHT ARROW Move the insertion point to the beginning of the next word
CTRL+LEFT ARROW Move the insertion point to the beginning of the previous word
CTRL+DOWN ARROW Move the insertion point to the beginning of the next paragraph
CTRL+UP ARROW Move the insertion point to the beginning of the previous paragraph
SHIFT+DELETE Delete selected item permanently without placing the item in the Recycle Bin
ESC Cancel the current task
F1 Displays Help
F2 Rename selected item
F3 Search for a file or folder
F4 Display the Address bar list in My Computer or Windows Explorer
F5 Refresh the active window
F6 Cycle through screen elements in a window or on the desktop
F10 Activate the menu bar in the active program
SHIFT+F10 Display the shortcut menu for the selected item
CTRL+ESC Display the Start menu
SHIFT+CTRL+ESC Launches Task Manager
SHIFT when you insert a CD Prevent the CD from automatically playing
WIN Display or hide the Start menu
WIN+BREAK Display the System Properties dialog box
WIN+D Minimizes all Windows and shows the Desktop
WIN+E Open Windows Explorer
WIN+F Search for a file or folder
WIN+F+CTRL Search for computers
WIN+L Locks the desktop
WIN+M Minimize or restore all windows
WIN+R Open the Run dialog box
WIN+TAB Switch between open items
Windows Explorer Shortcuts:
ALT+SPACEBAR - Display the current window’s system menu
SHIFT+F10 - Display the item’s context menu
CTRL+ESC - Display the Start menu
ALT+TAB - Switch to the window you last used
ALT+F4 - Close the current window or quit
CTRL+A - Select all items
CTRL+X - Cut selected item(s)
CTRL+C - Copy selected item(s)
CTRL+V - Paste item(s)
CTRL+Z - Undo last action
CTRL+(+) - Automatically resize the columns in the right hand pane
TAB - Move forward through options
ALT+RIGHT ARROW - Move forward to a previous view
ALT+LEFT ARROW - Move backward to a previous view
SHIFT+DELETE - Delete an item immediately
BACKSPACE - View the folder one level up
ALT+ENTER - View an item’s properties
F10 - Activate the menu bar in programs
F6 - Switch between left and right panes
F5 - Refresh window contents
F3 - Display Find application
F2 - Rename selected item
Internet Explorer Shortcuts:
CTRL+A - Select all items on the current page
CTRL+D - Add the current page to your Favorites
CTRL+E - Open the Search bar
CTRL+F - Find on this page
CTRL+H - Open the History bar
CTRL+I - Open the Favorites bar
CTRL+N - Open a new window
CTRL+O - Go to a new location
CTRL+P - Print the current page or active frame
CTRL+S - Save the current page
CTRL+W - Close current browser window
CTRL+ENTER - Adds the http://www. (url) .com
SHIFT+CLICK - Open link in new window
BACKSPACE - Go to the previous page
ALT+HOME - Go to your Home page
HOME - Move to the beginning of a document
TAB - Move forward through items on a page
END - Move to the end of a document
ESC - Stop downloading a page
F11 - Toggle full-screen view
F5 - Refresh the current page
F4 - Display list of typed addresses
F6 - Change Address bar and page focus
ALT+RIGHT ARROW - Go to the next page
SHIFT+CTRL+TAB - Move back between frames
SHIFT+F10 - Display a shortcut menu for a link
SHIFT+TAB - Move back through the items on a page
CTRL+TAB - Move forward between frames
F1 - Display Internet Explorer Help
Closing Open Holes, System Security How to close open holes
Categories: DOS Tips, System SecurityWith the spread of Hackers and Hacking incidents, the time has come, when not only system administrators of servers of big companies, but also people who connect to the Internet by dialing up into their ISP, have to worry about securing their system. It really does not make much difference whether you have a static IP or a dynamic one, if your system is connected to the Internet, then there is every chance of it being attacked.
This manual is aimed at discussing methods of system security analysis and will shed light on as to how to secure your standalone (also a system connected to a LAN) system.
Open Ports: A Threat to Security?
In the Netstat Tutorial we had discussed how the netstat -a command showed the list of open ports on your system. Well, anyhow, before I move on, I would like to quickly recap the important part. So here goes, straight from the netstat tutorial:
Now, the ??a? option is used to display all open connections on the local machine. It also returns the remote system to which we are connected to, the port numbers of the remote system we are connected to (and the local machine) and also the type and state of connection we have with the remote system.
For Example,
C:\windows>netstat -a
Active Connections
Proto Local Address Foreign Address State
TCP ankit:1031 dwarf.box.sk:ftp ESTABLISHED
TCP ankit:1036 dwarf.box.sk:ftp-data TIME_WAIT
TCP ankit:1043 banners.egroups.com:80 FIN_WAIT_2
TCP ankit:1045 mail2.mtnl.net.in op3 TIME_WAIT
TCP ankit:1052 zztop.boxnetwork.net:80 ESTABLISHED
TCP ankit:1053 mail2.mtnl.net.inop3 TIME_WAIT
UDP ankit:1025 *:*
UDP ankit:nbdatagram *:*
Now, let us take a single line from the above output and see what it stands for:
Proto Local Address Foreign Address State
TCP ankit:1031 dwarf.box.sk:ftp ESTABLISHED
Now, the above can be arranged as below:
Protocol: TCP (This can be Transmission Control Protocol or TCP, User Datagram Protocol or UDP or sometimes even, IP or Internet Protocol.)
Local System Name: ankit (This is the name of the local system that you set during the Windows setup.)
Local Port opened and being used by this connection: 1031
Remote System: dwarf.box.sk (This is the non-numerical form of the system to which we are connected.)
Remote Port: ftp (This is the port number of the remote system dwarf.box.sk to which we are connected.)
State of Connection: ESTABLISHED
?Netstat? with the ??a? argument is normally used, to get a list of open ports on your own system i.e. on the local system. This can be particularly useful to check and see whether your system has a Trojan installed or not. Yes, most good Antiviral software are able to detect the presence of Trojans, but, we are hackers, and need to software to tell us, whether we are infected or not. Besides, it is more fun to do something manually than to simply click on the ?Scan? button and let some software do it.
The following is a list of Trojans and the port numbers which they use, if you Netstat yourself and find any of the following open, then you can be pretty sure, that you are infected.
Port 12345(TCP) Netbus
Port 31337(UDP) Back Orifice
—-
Now, the above tutorial resulted in a number of people raising questions like: If the ‘netstat -a’ command shows open ports on my system, does this mean that anyone can connect to them? Or, How can I close these open ports? How do I know if an open port is a threat to my system’s security of not? Well, the answer to all these question would be clear, once you read the below paragraph:
Now, the thing to understand here is that, Port numbers are divided into three ranges:
The Well Known Ports are those from 0 through 1023. This range or ports is bound to the services running on them. By this what I mean is that each port usually has a specific service running on it. You see there is an internationally accepted Port Numbers to Services rule, (refer RFC 1700 Here) which specifies as to on what port number a particular service runs. For Example, By Default or normally FTP runs on Port 21. So if you find that Port 21 is open on a particular system, then it usually means that that particular system uses the FTP Protocol to transfer files. However, please note that some smart system administrators delibrately i.e. to fool lamers run fake services on popular ports. For Example, a system might be running a fake FTP daemon on Port 21. Although you get the same interface like the FTP daemon banner, response numbers etc, however, it actually might be a software logging your prescence and sometimes even tracing you!!!
The Registered Ports are those from 1024 through 49151. This range of port numbers is not bound to any specific service. Actually, Networking utlites like your Browser, Email Client, FTP software opens a random port within this range and starts a communication with the remote server. A port number within this range is the reason why you are able to surf the net or check your email etc.
If you find that when you give the netstat -a command, then a number of ports within this range are open, then you should probably not worry. These ports are simply opened so that you can get your software applications to do what you want them to do. These ports are opened temporarily by various applications to perform tasks. They act as a buffer transfering packets (data) received to the application and vis-a-versa. Once you close the application, then you find that these ports are closed automatically. For Example, when you type Sign In in your browser, then your browser randomly chooses a Registered Port and uses it as a buffer to communicate with the various remote servers involved.
The Dynamic and/or Private Ports are those from 49152 through 65535. This range is rarely used, and is mostly used by trojans, however some application do tend to use such high range port numbers. For Example,Sun starts their RPC ports at 32768.
So this basically brings us to what to do if you find that Netstat gives you a couple of open ports on your system:
1. Check the Trojan Port List and check if the open port matches with any of the popular ones. If it does then get a trojan Removal and remove the trojan.
2. If it doesn’t or if the Trojan Remover says: No trojan found, then see if the open port lies in the registered Ports range. If yes, then you have nothing to worry, so forget about it.
***********************
HACKING TRUTH: A common technique employed by a number of system administrators, is remapping ports. For example, normally the default port for HTTP is 80. However, the system administrator could also remap it to Port 8080. Now, if that is the case, then the homepage hosted at that server would be at:
http://domain.com:8080 instead of
http://domain.com:80
The idea behind Port Remapping is that instead of running a service on a well known port, where it can easily be exploited, it would be better to run it on a not so well known port, as the hacker, would find it more difficult to find that service. He would have to port scan high range of numbers to discover port remapping.
The ports used for remapping are usually pretty easy to remember. They are choosen keeping in mind the default port number at which the service being remapped should be running. For Example, POP by default runs on Port 110. However, if you were to remap it, you would choose any of the following: 1010, 11000, 1111 etc etc
Some sysadmins also like to choose Port numbers in the following manner: 1234,2345,3456,4567 and so on… Yet another reason as to why Port Remapping is done, is that on a Unix System to be able to listen to a port under 1024, you must have root previledges.
************************
Firewalls
Use of Firewalls is no longer confined to servers or websites or commerical companies. Even if you simply dial up into your ISP or use PPP (Point to Point Protocol) to surf the net, you simply cannot do without a firewall. So what exactly is a firewall?
Well, in non-geek language, a firewall is basically a shield which protects your system from the untrusted non-reliable systems connected to the Internet. It is a software which listens to all ports on your system for any attempts to open a connection and when it detects such an attempt, then it reacts according to the predefined set of rules. So basically, a firewall is something that protects the network(or systen) from the Internet. It is derived from the concept of firewalls used in vehicles which is a barrier made of fire resistant material protecting the vehicle in case of fire.
Now, for a better ‘according to the bible’ defination of a firewall: A firewall is best described as a software or hardware or both Hardware and Software packet filter that allows only selected packets to pass through from the Internet to your private internal network. A firewall is a system or a group of systems which guard a trusted network( The Internal Private Network from the untrusted network (The Internet.)
NOTE: This was a very brief desciption of what a firewall is, I would not be going into the details of their working in this manual.
Anyway,the term ‘Firewalls’, (which were generally used by companies for commerical purposes) has evolved into a new term called ‘Personal Firewalls’. Now this term is basically used to refer to firewalls installed on a standalone system which may or may not be networked i.e. It usually connects to an ISP. Or in other words a personal firewall is a firewall used for personal use.
Now that you have a basic desciption as to what a firewall is, let us move on to why exactly you need to install a Firewall? Or, how can not installing a firewall pose a threat to the security of your system?
You see, when you are connected to the Internet, then you have millions of other untrusted systems connected to it as well. If somehow someone found out your IP address, then they could do probably anything to your system. They could exploit any vulnerability existing in your system, damage your data, and even use your system to hack into other computers.
Finding out someone’e IP Address is not very difficult. Anybody can find out your IP, through various Chat Services, Instant Messengers (ICQ, MSN, AOL etc), through a common ISP and numerous other ways. Infact finding out the IP Address of a specific person is not always the priority of some hackers.
What I mean to say by that is that there are a number of Scripts and utilities available which scan all IP addresses between a certain range for predefined common vulnerabilities. For Example, Systems with File Sharing Enabled or a system running an OS which is vulnerable to the Ping of Death attack etc etc As soon as a vulnerable system is found, then they use the IP to carry out the attacks.
The most common scanners look for systems with RAT’s or Remote Administration Tools installed. They send a packet to common Trojan ports and display whether the victim’s system has that Trojan installed or not. The ‘Scan Range of IP Addresses’ that these programs accept are quite wide and one can easily find a vulnerable system in the matter of minutes or even seconds.
Trojan Horses like Back Orifice provide remote access to your system and can set up a password sniffer. The combination of a back door and a sniffer is a dangerous one: The back door provides future remote access, while the sniffer may reveal important information about you like your other Passwords, Bank Details, Credit Card Numbers, Social Security Number etc If your home system is connected to a local LAN and the attacker manages to install a backdoor on it, then you probably have given the attacker the same access level to your internal network, as you have. This wouls also mean that you will have created a back door into your network that bypasses any firewall that may be guarding the front door.
You may argue with me that as you are using a dial up link to your ISP via PPP, the attacker would be able to access your machine only when you are online. Well, yes that is true, however, not completely true. Yes, it does make access to your system when you reconnect, difficult, as you have a dynamic Internet Protocol Address. But, although this provides a faint hope of protection, routine scanning of the range of IP’s in which your IP lies, will more often than not reveal your current Dynamic IP and the back door will provide access to your system.
*******************
HACKING TRUTH: Microsoft Says: War Dialer programs automatically scan for modems by trying every phone number within an exchange. If the modem can only be used for dial-out connections, a War Dialer won’t discover it. However, PPP changes the equation, as it provides bidirectional transportmaking any connected system visible to scanners?and attackers.
*******************
So how do I protect myself from such Scans and unsolicitated attacks? Well, this is where Personal Firewalls come in. They just like their name suggests, protect you from unsolicitated connection probes, scans, attacks.
They listen to all ports for any connection requests received (from both legitimate and fake hosts) and sent (by applications like Browser, Email Client etc.) As soon as such an instance is recorded, it pops up a warning asking you what to do or whether to allow the connection to initiate or not. This warning message also contains the IP which is trying to initiate the connection and also the Port Number to which it is trying to connect i.e. the Port to which the packet was sent. It also protects your system from Port Scans, DOS Attacks, Vulnerability attacks etc. So basically it acts as a shield or a buffer which does not allow your system to communicate with the untrusted systems directly.
Most Personal Firewalls have extensive logging facilities which allows you to track down the attackers. Some popular firewalls are:
1.BlackICE Defender : An IDS for PC’s. It’s available at
2. ZoneAlarm: The easiest to setup and manage firewall. Get it for free at:
Once you have installed a firewall on your system, you will often get a number of Warnings which might seem to be as if someone is trying to break into your system, however, they are actually bogus messages, which are caused by either your OS itself or due to the process called Allocation of Dynamic IP’s. For a details description of these two, read on.
Many people complain that as soon as they dial into their ISP, their firewall says that such and such IP is probing Port X. What causes them?
Well, this is quite common. The cause is that somebody hung up just before you dialed in and your ISP assigned you the same IP address. You are now seeing the remains of communication with the previous person. This is most common when the person to which the IP was assigned earlier was using ICQ or chat programs, was connected to a Game Server or simply turned off his modem before his communication with remote servers was complete.
You might even get a message like: Such and Such IP is trying to initaite a Netbios Session on Port X. This again is extrememly common. The following is an explanation as to why it happens, which I picked up a couple of days ago: NetBIOS requests to UDP port 137 are the most common item you will see in your firewall reject logs. This comes about from a feature in Microsoft’s Windows: when a program resolves an IP address into a name, it may send a NetBIOS query to IP address. This is part of the background radiation of the Internet, and is nothing to be concerned about.
What Causes them? On virtually all systems (UNIX, Macintosh, Windows), programs call the function ‘gethostbyaddr()’ with the desired address. This function will then do the appropriate lookup, and return the name. This function is part of the sockets API. The key thing to remember about gethostbyaddr() is that it is virtual. It doesn’t specify how it resolves an address into a name. In practice, it will use all available mechanisms. If we look at UNIX, Windows, and Macintosh systems, we see the following techniques:
DNS in-addr.arpa PTR queries sent to the DNS server
NetBIOS NodeStatus queries sent to the IP address
lookups in the /etc/hosts file
AppleTalk over IP name query sent to the IP address
RPC query sent to the UNIX NIS server
NetBIOS lookup sent to the WINS server
Windows systems do the /etc/hosts, DNS, WINS, and NodeStatus techniques. In more excruciating detail, Microsoft has a generic system component called a naming service. All the protocol stacks in the system (NetBIOS, TCP/IP, Novel IPX, AppleTalk, Banyan, etc.) register the kinds of name resolutions they can perform. Some RPC products will likewise register an NIS naming service. When a program requests to resolve an address, this address gets passed onto the generic naming service. Windows will try each registered name resolution subsystem sequentially until it gets an answer.
(Side note: User’s sometimes complained that accessing Windows servers is slow. This is caused by installing unneeded protocol stacks that must timeout first before the real protocol stack is queried for the server name.).
The order in which it performs these resolution steps for IP addresses can be configured under the Windows registry key
HKEY_LOCAL_MACHINE\SYSTEM\CurrentControlSet\Servic es\Tcpip\ServiceProvider.
Breaking Through Firewalls
Although Firewalls are meant to provide your complete protection from Port Scan probes etc there are several holes existing in popular firewalls, waiting to be exploited. In this issue, I will discuss a hole in ZoneAlarm Version 2.1.10 to 2.0.26, which allows the attacker to port scan the target system (Although normally it should stop such scans.)
If one uses port 67 as the source port of a TCP or UDP scan, ZoneAlarm will let the packet through and will not notify the user. This means, that one can TCP or UDP port scan a ZoneAlarm protected computer as if there were no firewall there IF one uses port 67 as the source port on the packets.
Exploit:
UDP Scan:
You can use NMap to port scan the host with the following command line:
nmap -g67 -P0 -p130-140 -sU 192.168.128.88
(Notice the -g67 which specifies source port).
TCP Scan:
You can use NMap to port scan the host with the following command line:
nmap -g67 -P0 -p130-140 -sS 192.168.128.88
(Notice the -g67 which specifies source port).
Make Your Own Command Prompt
Categories: DOS TipsStep 1 - Copy the following script:
Code:
code(surrounded by [])@echo off
cls
:loop
set command=
echo ——————————–
chdir
set /P command=”Prompt: “
echo ——————————–
%command%
goto loop
Step 2 - Paste on Notepad and save the file as cmd.bat
Stop Windows XP from Cache thumbnail
Windows XP keeps a thumbnail cache of images on your machine. However, if
these images change frequently, the OS might not always update the
cache file, and thus display the wrong thumbnail. For the same reason,
you might simply want to prevent the OS from creating the cache file
(i.e., thumbs.db) altogether. To stop the OS from maintaining the
cache file, perform the following steps:
1. Start a registry editor (e.g., regedit.exe).
2. Navigate to the
HKEY_CURRENT_USER\Software\Microsoft\Windows\Curre ntVersion\Explorer\Advanced
registry subkey.
3. Double-click the DisableThumbnailCache value or create this
value of type DWORD if it doesn't exist.
4. Set the value to 1, then click OK.
5. Close the registry editor.
6. Log off and log on for the change to take effect.
Or
Open My Computer --> Tools Menu --> Folder Option --> View Tab -->Advance Setting
Check mark "Do not Cache Thumbnails"
Stop XP to display unread messages count on Welcome Screen
7 Ways to Optimize Windows XP
This indexing service gets info from files on the hard drive and creates a "searchable
keyword index."
If you don't use the XP search feature often to look for documents, you can turn this feature
off, and the difference you'll notice is a slight increase in the time it takes for your computer
to find a file, but an overall increase in general speed for everything else.
How to : From My Computer > right-click on the C: Drive > select Properties.
Uncheck "Allow Indexing Service to index this disk for fast file searching." Apply changes to "C:
sub folders and files," and click OK.
2. Clean Up Prefetch, temp, and cache files
Windows stores a lot of temporary files that can be safely cleaned out once a month or so.
This is also good to do before running virus or spyware scans, as it clears many things out of
your system that would need to be scanned.
How to : Download CleanUp!
How to use CleanUp! : Download, Install, and Run.
3. Install some RAM
If you are running 128mb or 256mb of Ram, it's pretty cheap and easy to upgrade to 512mb.
This is the only suggestion I will make that will actually cost money, but it's also the one that
will best improve performance.
How to : Not sure how to install Ram, or even what kind you need or where to get it from?
Check out Blifaloo's article on how to Add Ram to your PC.
4. Remove Programs & files you no longer need or use IPB Image
Having old games or other software you no longer use can take up a lot of space on your hard
drive, which can lead to an overall decrease in your PC's performance.
How to : Removing old programs is easy. From the Control Panel click on the "Add or Remove
Programs" Icon. You can safely remove programs like games, demos, and other software you no
longer use. If you are not sure what a program is... don't delete it just yet. You can do an
internet search to find out more about any mystery programs installed on your PC to decide to
delete them or not.
Remember: Mp3 music files and videos you download can take up a lot of space. Go through your media files once a month or so and delete the ones you no longer use.
5. Turn off Windows Animations and Visual Effects
Fancy sliding, fading and animated effects that windows uses by default are easily turned
off, and will make the reaction time of simple tasks like opening and moving windows, taskbars,
etc... much quicker.
How to : From the Control Panel, click on the "System" icon. Click on the Advanced tab. Click the
"Settings" button underneath "Performance". Uncheck the options related to animations, and other unneeded visual effects.
Personally, I only have 3 items checked in here: "smooth edges of screen fonts", "use common
tasks in folders", and "use visual styles on windows and buttons". You can uncheck all of them if
you like. But, just getting rid of all the animated features will help the responsiveness of your
PC.
6. Remove unused Fonts
Having too many fonts can realllllllly slow down how fast programs start up. Some people say
have no more than 500 fonts installed on WinXP, but I personally try to keep the number of fonts below 200. The less you have the faster your programs that use them (office software, graphic programs etc..) will load.
How to : From the Control Panel, click on the "Fonts" icon. You can delete the fonts you don't use here. Remember: to keep the basics: Verdana, Arial, Times, Trebuchet, Courier, serif, sans-serif,
Georgia, etc... Along with any fonts related to your business.
7. Get a Virus, Spyware and Malware Clean System
Chances are you have some sort of virus, spyware or malware on your computer.
How to : Get Adware and Spybot S&D in addition to a Firewall and Antivirus program.
Remember: Keep your anti-virus programs up-to-date. And always research any software you plan on downloading to "help" your PC. Some anti-virus / anti-spyware software actually have spyware.